Wednesday, May 11, 2011

DaLene's Quilts

Thought I would share my latest custom quilting design.
She will be binding it.
Thank you I hope it brings your family fun memories of movie watching and snuggling!
Top 
Feathered Circle
Back
Top

Back


Tuesday, May 10, 2011

Have holes in your jeans?   Give those old jeans some new life with just a bit of sewing.
Materials:
  • Ripped Jeans
  • Iron-on Patches
  • Cookie Cutter
  • Sharpie
  • Scrap of fabric
  • Wonder Under
  • Sewing supplies
    
Instructions:
  1. I traced around the butterfly on the back side of my patch using a Sharpie. This may shock a few of you, but I tried pencil, and a Mark B Gone pen and they just didn’t show up. The Sharpie worked great, I was just careful to cut inside the line of black. You could use a white fabric marking pencil, but I couldn’t find mine. -Do what you can with what you have, I guess.


  2. I also cut out a flower for a different pair. This one I embellished with another fabric too.


  3. I had a scrap of fabric with a perfect flower.


  4. I used a small bit of Wonder Under on the back side of my chosen flower. Iron it on.


  5. Then cut around the flower. The Wonder Under isn’t strictly necessary for a piece this small. It’s peace of mind that it won’t fall off. Peel off the paper backing…


  6. DON’T try to iron it onto your patch yet! Your patch will get sticky on the back, and be stuck to your ironing board. (No, I didn’t do that… but I wouldn’t put it past me.)


  7. Stitch your embellishment onto your cut patch using a blanket stitch or a zigzag.


  8. Now you can iron the whole thing over the hole in your jeans.


  9. I rolled the jeans up, to make the sewing easier.  I used a heavier weight- DMC thread, a heavy needle…


  10. ...and a thimble to stitch around the flower. I kept my needle working from the top as shown. It’s a little tough to sew through the denims, but not too bad.

Cup Cake Quilt

Cupcakes Quilt
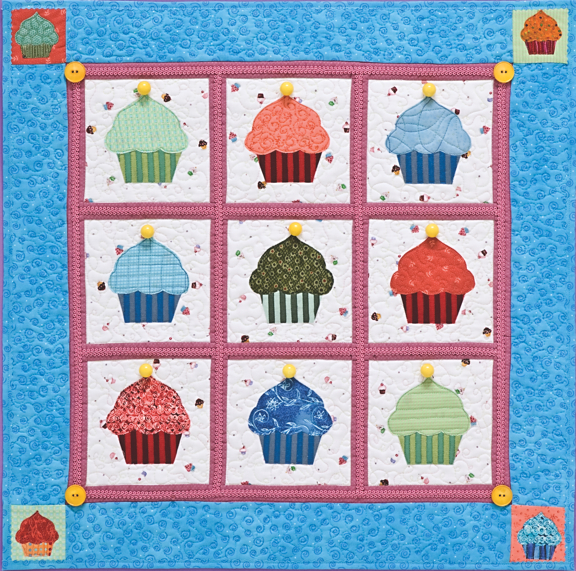
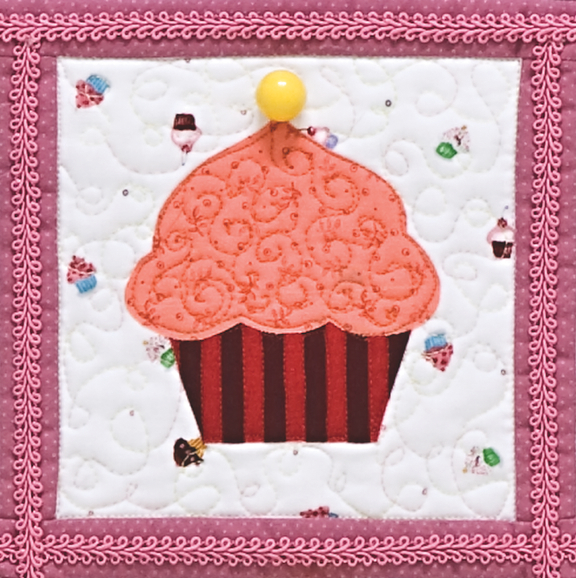
Indulge your sweet tooth with this colorful cupcake quilt. 
This project is an excerpt from C&T Publishing Cupcakes! 
by Lynn Koolish which includes 29 other yummy projects for sewers, quilters, knitters, and bakers!!


Materials:
  • Block background fabric: 9 squares 6˝ × 6˝ (½ yard)
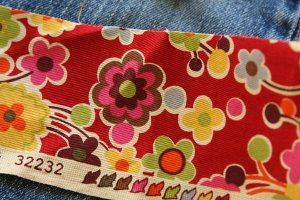
  • Scraps for cupcake appliqués
  • Border corner blocks: 4 scraps 3˝ × 3˝
  • Sashing fabric: 6 strips 1¼˝ × 6˝, 4 strips 1¼˝ × 18½˝, and 2 strips 1¼˝ × 20˝ (1/4 yard)
  • Border fabric: 4 strips 3˝ × 20˝ for borders, additional strips for binding (¼ yard)
  • Backing fabric: 26˝ × 26˝ (¾ yard)
  • Batting: 26˝ × 26˝
  • Decorative trim: 4½ yards (optional)
  • Buttons
  • Paper-backed fusible web, 17˝ wide: ½ yard
     
Instructions:
Note: Seam allowances are 1/4˝.
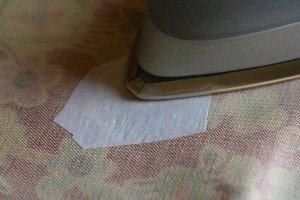
  1. Iron paper-backed fusible web to the wrong side of the fabric scraps for the cupcake appliqués. Remove the paper backing.
     
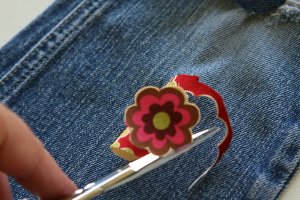
  2. Click here to download the cupcake patterns. Use the patterns to cut out the top and bottom pieces for 9 cupcakes.

    Cupcakes Quilt Close
     
  3. Reduce the cupcake pattern 50%, and cut out pieces for 4 mini cupcakes for the corner blocks.
     
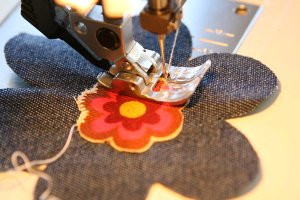
  4. Create 9 blocks by fusing the cupcake pieces to the block backgrounds.
     
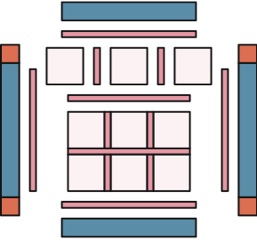
  5. Sew the 11/4˝ × 6˝ sashing pieces between the blocks to create 3 rows. Press.
     
  6. Sew the rows together with the 11/4˝ × 181/2˝ sashing strips. Press.
     
  7. Sew a 11/4˝ × 181/2˝ strip on each side. Press.
     
  8. Sew the 11/4 ˝ × 20˝ sashing strips on the top and bottom. Press.
     
  9. Sew border strips to the top and bottom. Press.
     
  10. Fuse the mini cupcakes to the corner blocks. Sew the corner blocks to each end of the remaining border strips. Press.
     
  11. Sew the remaining border strips to the sides. Press.
     
  12. Layer the backing, batting, and quilt top. Baste.
     
  13. Quilt and bind. Embellish with trim and buttons.

     
Diagram