In my "wanderings" I have been able to come upon a few fun projects and thought i would link you over- click on these great projects. Thanks for stopping!!
The following are FREE patterns that were posted by a company by the name of "David Textiles Inc."
HAPPY QUILTING!!
Flowers
Regency
Floral Medallions
Peace
Cuddle Me
Butterflies and Flowers
Patriotic
Summer Fun
Neutral Bliss
Fall Leaves
Harvest Leaves
Native Hues
Birds and Holly
Lady Rose
Memories

Showing posts with label HOLIDAY. Show all posts
Showing posts with label HOLIDAY. Show all posts
Wednesday, October 19, 2011


Tuesday, May 10, 2011
Cup Cake Quilt
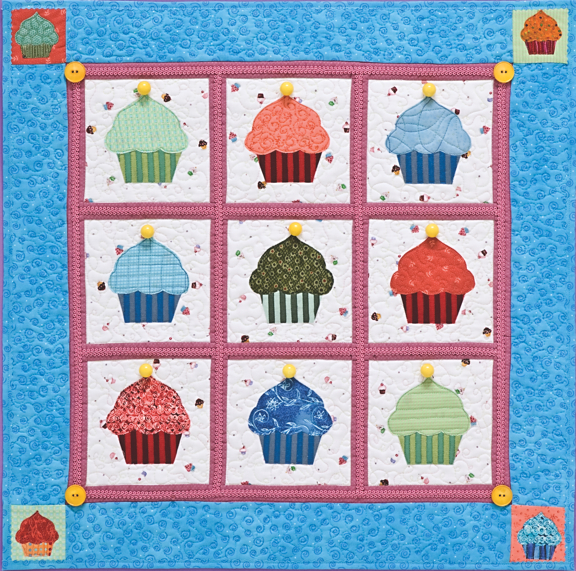
Indulge your sweet tooth with this colorful cupcake quilt.
This project is an excerpt from C&T Publishing Cupcakes!
by Lynn Koolish which includes 29 other yummy projects for sewers, quilters, knitters, and bakers!!
Materials:
- Block background fabric: 9 squares 6˝ × 6˝ (½ yard)
- Scraps for cupcake appliqués
- Border corner blocks: 4 scraps 3˝ × 3˝
- Sashing fabric: 6 strips 1¼˝ × 6˝, 4 strips 1¼˝ × 18½˝, and 2 strips 1¼˝ × 20˝ (1/4 yard)
- Border fabric: 4 strips 3˝ × 20˝ for borders, additional strips for binding (¼ yard)
- Backing fabric: 26˝ × 26˝ (¾ yard)
- Batting: 26˝ × 26˝
- Decorative trim: 4½ yards (optional)
- Buttons
- Paper-backed fusible web, 17˝ wide: ½ yard
Instructions:
Note: Seam allowances are 1/4˝.
- Iron paper-backed fusible web to the wrong side of the fabric scraps for the cupcake appliqués. Remove the paper backing.
- Click here to download the cupcake patterns. Use the patterns to cut out the top and bottom pieces for 9 cupcakes.
- Reduce the cupcake pattern 50%, and cut out pieces for 4 mini cupcakes for the corner blocks.
- Create 9 blocks by fusing the cupcake pieces to the block backgrounds.
- Sew the 11/4˝ × 6˝ sashing pieces between the blocks to create 3 rows. Press.
- Sew the rows together with the 11/4˝ × 181/2˝ sashing strips. Press.
- Sew a 11/4˝ × 181/2˝ strip on each side. Press.
- Sew the 11/4 ˝ × 20˝ sashing strips on the top and bottom. Press.
- Sew border strips to the top and bottom. Press.
- Fuse the mini cupcakes to the corner blocks. Sew the corner blocks to each end of the remaining border strips. Press.
- Sew the remaining border strips to the sides. Press.
- Layer the backing, batting, and quilt top. Baste.
- Quilt and bind. Embellish with trim and buttons.


Monday, February 14, 2011
Sharing Valentine Wall Quilts
Valentine's Day

Wall Quilt
Log cabin design
I love Valentine's Day and love creating fun projects.
When I saw this cute wall quilt, I couldn't stop thinking about how fun it was.
I asked the creator, Nancy Arehart, if I could share it on this blog...
and she said YES!!
She said that she saw this done once and decided to recreate it from memory... that's talent...
So I though that I would try to help the rest of us all with the assembly.
 |
| Fun Fabric detail too. |
 |
| notice the fun ribbon embellishment in the center. |
The Log Cabin Assemble design:
I found a great explanation here at:
http://quilt.com/Blocks/LogCabin/LogCabin.html
but more great assembly instructions are here at this site too. I have visited there many times.
I simply re-posted it here -I have modified it a bit but for the most part its the same.
You will need:
8 red/white Log Cabin blocks
2 red Logs Cabin Blocks
2 white Log Cabin Blocks
The Border can be any width - a 3 inch boarder would be nice- you will need to cut it out to measure 3 1/2 inches wide to allow for the seam allowance.
You may like to add 2 boarders like in this creation.
Batting you might like to use will be a warm and natural or maybe a polyester - no more than 1/4 in thick.
You can use this for a Table Quilt or a Wall hanging.
HAPPY VALENTINE'S DAY and GET CREATIVE!!
Fabric
The Log Cabin block uses three different fabrics. Traditionally, the center square was red fabric symbolizing the hearth, or the fireplace- which was a representation of the warmth (heart) of the home.
But you can use any and all colors- your design is only limited to your imagination.
 Fabric A
 Fabric B
 Fabric C
Cutting the fabric
Note: The requirements given below are for those who wish to cut all of the "logs" before joining them to the block. This block requires: | one 2-1/2" square of Fabric A |
 | 1-1/2" x 2-1/2" rectangle of Fabric B |
  | 1-1/2" x 3-1/2" rectangle of both Fabric B and Fabric C |
  | 1-1/2" x 4-1/2" rectangle of both Fabric B and Fabric C |
  | 1-1/2" x 5-1/2" rectangle of both Fabric B and Fabric C |
  | 1-1/2" x 6-1/2" rectangle of both Fabric B and Fabric C |
  | 1-1/2" x 7-1/2" rectangle of both Fabric B and Fabric C |
  | 1-1/2" x 8-1/2" rectangle of both Fabric B and Fabric C |
 Piecing the block
The Log Cabin block begins with a center fabric square which is surrounded by "logs". The logs are joined to the block in a circular fashion starting with shorter logs and working out to the longer ones. The logs are joined in a circular fashion with the block being rotated 90° counter-clockwise after each log is joined. The current log being joined is always started on the log which was just joined to the block.Pressing Note: The seam allowances in this block are always pressed toward the rectangle which has just been joined to the block. | 1) Join the 2-1/2" square of Fabric A to the 1-1/2" x 2-1/2" rectangle of Fabric B. |
 | 2) Turn the block 90° counter-clockwise and join the 1-1/2" x 3-1/2" of Fabric B. |
 | 3) Turn the block 90° counter-clockwise and join the 1-1/2" x 3-1/2" of Fabric C. |
 | 4) Turn the block 90° counter-clockwise and join the 1-1/2" x 4-1/2" of Fabric C. |
 | 5) Turn the block 90° counter-clockwise and join the 1-1/2" x 4-1/2" of Fabric B. |
 | 6) Turn the block 90° counter-clockwise and join the 1-1/2" x 5-1/2" of Fabric B. |
 | 7) Turn the block 90° counter-clockwise and join the 1-1/2" x 5-1/2" of Fabric C. |
 | 8) Turn the block 90° counter-clockwise and join the 1-1/2" x 6-1/2" of Fabric C. |
 | 9) Turn the block 90° counter-clockwise and join the 1-1/2" x 6-1/2" of Fabric B. |
 | 10) Turn the block 90° counter-clockwise and join the 1-1/2" x 7-1/2" of Fabric B. |
 | 11) Turn the block 90° counter-clockwise and join the 1-1/2" x 7-1/2" of Fabric C. |
 | 12) Turn the block 90° counter-clockwise and join the 1-1/2" x 8-1/2" of Fabric C. |
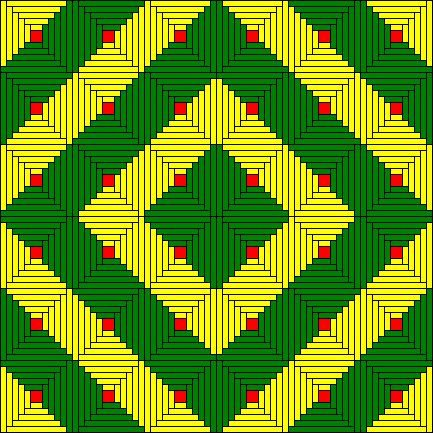
Other designs can be created as well-
to see other designs you may like to Click one of the following:
LogCabin- Furrows
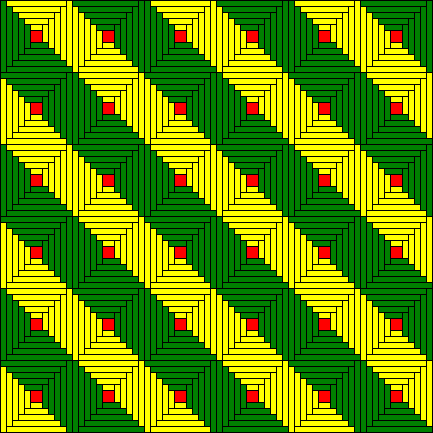
Sunshine and Shadows
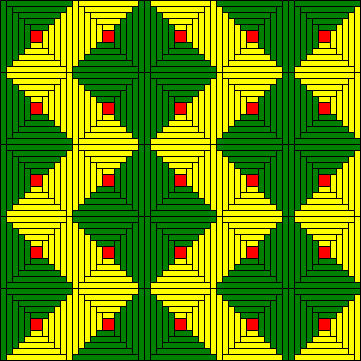
Barn raising
This method is also used and I actually like it best- It takes out all the pre-cutting.
 | 1) If making more than one Log Cabin block, it is quicker to cut the fabric strips after sewing the strip to the block rather than cutting the strips before. Cut the center 2-1/2" square of Fabric A as shown above. Then cut several 1-1/2" strips of Fabric B and several 1-1/2" strips of Fabric C. (The amount needed depends upon the number of blocks begin made. Start the block by joining the 2-1/2" squares of Fabric A to one of the 1-1/2" strips of Fabric B in a continuous line leaving a small space between each of the Fabric A Squares. Press the seam allowance toward the 1-1/2" strip. |
 | 2) With the rotary cutter, carefully cut the Step 1 strip apart being sure that the cut is made straight along the side of the Fabric A square. In other words, make sure that the block stays square. Now, take these units, and piece them to the 1-1/2" strip of Fabric B, leaving a small space between each unit and being sure that the most recently pieced part of the block being the first part to be joined. Press the seam allowance toward the just added strip. |
 | Cut the Step 2 units apart as described above. Continue to add new strips, as described in Step 2, to the block, making sure that the strips are alternated between Fabric B and Fabric C every two "logs". After adding the new strip, press the seam allowance toward the most recently joined strip and making sure to cut the blocks even. Continue until the desired size is reached. |
Piecing a Single Block
While the above technique shows several Log Cabin blocks being pieced at one time, the technique can be used to piece single blocks as well. Simple, sew the block to the correct 1-1/2" fabric strip and cut the strip to the correct length after the strip is joined.HAPPY QUILTING!
Monday, February 7, 2011
Valentine Boxes
 |
This is a must to do for Valentine's Day Who wouldn't L-O-V-E this cute little box to hold cards and treats for Valentine's Day?   My kids love Valentine's Day- really, who doesn't- when chocolate is involved?? I love this time of year- I get so giddy about the cute pink and red decorations, chocolate, flowers, heart shaped crafts your kids bring home from school, chocolate, heart shaped sugar cookies, chocolate, the extra hugs and kisses you get from your kids, a special dinner or night out with your true love and did I mention all the CHOCOLATE? My kids love Valentine's Day- really, who doesn't- when chocolate is involved?? I love this time of year- I get so giddy about the cute pink and red decorations, chocolate, flowers, heart shaped crafts your kids bring home from school, chocolate, heart shaped sugar cookies, chocolate, the extra hugs and kisses you get from your kids, a special dinner or night out with your true love and did I mention all the CHOCOLATE?So this year we decided that super cute Valentine Boxes would be a fun project this year- we hope you like them too. |
Sunday, December 5, 2010
Christmas Presents

The Best Activities Bag EVER!!

This will be the last Activity Bag that you will ever buy.
It is the best thing, next to Chocolate!
To make your own you might want to check out Amazons offer on this chalk Cloth!
48'' Wide Chalk Cloth Fabric By The Yard
It is the best thing, next to Chocolate!
To make your own you might want to check out Amazons offer on this chalk Cloth!
48'' Wide Chalk Cloth Fabric By The Yard
Wednesday, November 10, 2010
Happy Turkey is finally here!!
"The Happy Turkey
A pieced turkey with "Raw-Edge" Appliqué"

Items that you will need:
Standard sewing kit
Scissors and/or Rotary cutter and cutting board with rulers
pins
iron on / fusible interfacing
thread to match your fabrics
Sewing machine
Fabric for turkey, front border, back and binding is as listed in the Pattern/instructional booklet
FOR FURTHER DETAILED INSTRUCTIONS AND APPLIQUE PATTERN
PLEASE PURCHASE BOOKLET BY CLICKING ON THE BUY NOW BUTTON AT THE RIGHT OF THIS BLOG-- NO LONGER AVAILABLE
QUESTIONS?
Email me at TSCquilting@hotmail.com
or at
the_secret_closet@hotmail.com
Be sure that in the subject box you put "HAPPY TURKEY"
QUESTIONS?
Email me at TSCquilting@hotmail.com
or at
the_secret_closet@hotmail.com
Be sure that in the subject box you put "HAPPY TURKEY"
Saturday, November 6, 2010
Great Christmas Ideas for QUILTERS
Hey all you fun quilter's out there!
I LOVE THIS SEASON!!!
"Sew", don't wait to long and come back soon for more!!!
Here is a few great Ideas for the quilter's in your life:
I LOVE THIS SEASON!!!
"Sew", don't wait to long and come back soon for more!!!
Here is a few great Ideas for the quilter's in your life:
Monday, October 18, 2010
Getting Busy... with Halloween Costumes!
With Halloween just around the corner- I have been thinking of a few realy quick costume ideas that are fast and easy to make.
One of the costume ideas are:
Wednesday, October 6, 2010
Happy Pumpkin Table Runner

Happy Pumpkin Table Runner
click here for a printable version of instructions
If you choose you may purchase the instructions and pattern directly from me-
to do this click on the "Add to Cart" button on the right.
Items that you will need:
Friday, October 1, 2010
"EEK" witch door decoration


"EEK!"
This Cute door decoration is "SEW" Fun! What a fun craft to get the whole family involved in.
 |
| Outside View |
 |
| Inside View |
Subscribe to:
Posts (Atom)